My IRC Setup
reject modernity embrace the '90s
![[sphere]'s avatar](https://substackcdn.com/image/fetch/$s_!fBV1!,w_108,h_108,c_fill,f_webp,q_auto:good,fl_progressive:steep/https%3A%2F%2Fsubstack-post-media.s3.amazonaws.com%2Fpublic%2Fimages%2F2cb50ab0-5b18-4bc5-b833-d5275ee825a6_551x551.jpeg)
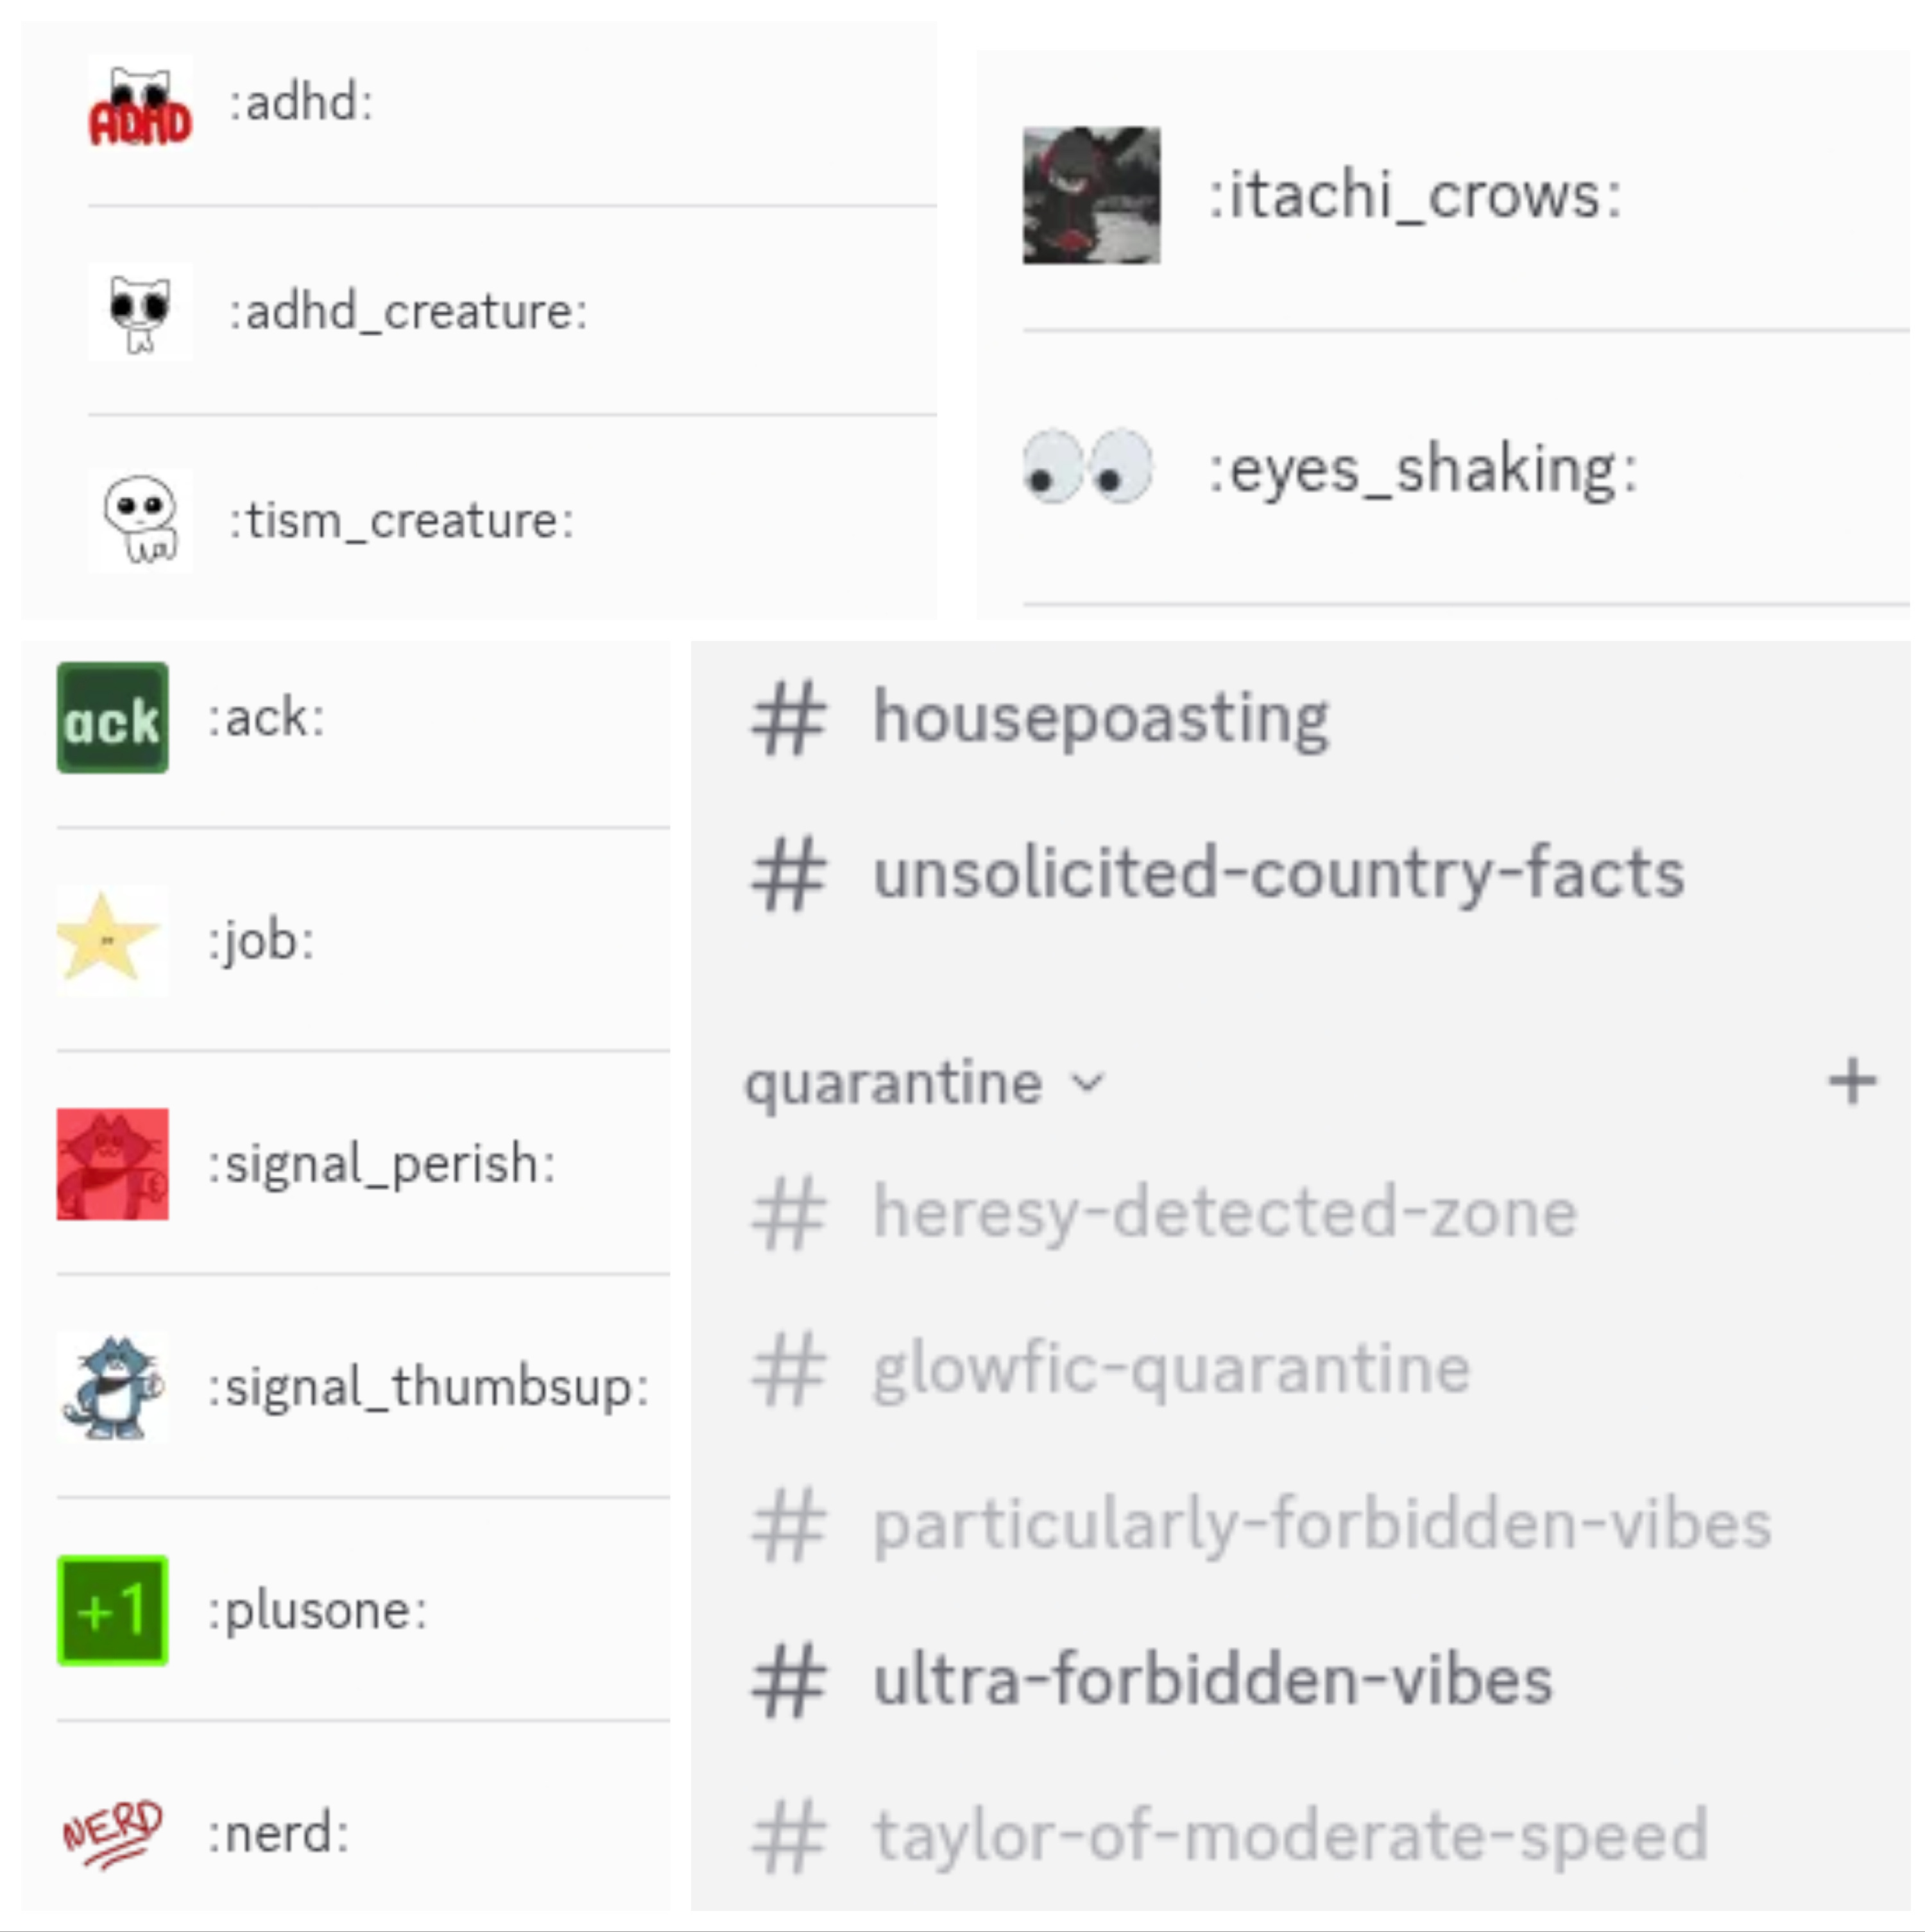
I run a small Discord server for my personal friends, initially in order to coordinate IRL events like the weekly craft nights I host at my house but increasingly also as a private place to hang out online when I don’t necessarily want to spew my thoughts to my thousands of Tumblr followers. It’s a cozy server with idiosyncratic rules (banned topics: current events, LLMs, and the D&D campaign my household is running), idiosyncratic channels (we have a quarantine channel, #taylor-of-moderate-speed, specifically for talking about Taylor Swift), and idiosyncratic custom emojis (:adhd:, my beloved). The infrastructure mostly amounts to a single extremely janky bot named Melon Usk that I wrote to post the craft night event thread, compile RSVP emoji reacts into lists of attendees in the event post (he does this very well), and ping everyone who RSVP’d with a reminder an hour before the event starts (something is wrong with my datetime math, so he usually does this at a randomly selected time many hours too early but not always by the same amount of hours).
Nothing overtly NSFW is happening in this server, but it is an adults-only space and I don’t really care to moderate myself or my friends for hypothetical teenagers I can guarantee aren’t present (because everyone in the server is someone I’ve met IRL and/or someone I’ve known online for years). I also don’t care to have my messages screened by whatever flaky ML model Discord uses to decide what messages and content are Inappropriate For Children, and I especially don’t care to force all of my friends to send Discord their photo IDs to be immediately leaked. (IMO this isn’t even a good way to protect teenagers, but that’s a topic for another post.) The best time to move your online life onto a new platform is of course before the old one becomes unusable, so I decided it was time to start investigating alternatives.
And, you know what, maybe 2026 is the year of Linux on the desktop the year of moving back to IRC.
My review
Would I recommend setting up an IRC server to a nontechnical user? No, probably not. IRC in 2026 is the domain of people who are too l33t for GitHub and host their repos on websites I’ve barely heard of like Sourcehut and Codeberg. The matrix of clients and supported features is frankly terrifying. Mobile support is, uh. Well.
But the IRCv3 spec smooths out a lot of pain points with old-school IRC; once I got all my shit set up properly I was able to chat freely across multiple devices without worrying about any of them camping my username, and there’s even a draft spec for emoji reactions (although very very few clients implement it yet). And the server (“ircd”, to IRC Knowers) I chose was Ergo, which, in addition to supporting all the fancy IRCv3 features, integrates history storage (functionally a “bouncer”) and user account/channel registration features out of the box. The documentation is targeted at people who are Already IRC Knowers, which I decidedly am not, but it is documented, and the default config file goes over (almost) all the options in exhaustive enough detail that I’m reasonably confident in my choices.
Overall, if you’re comfortable with the Unix command line, have $10/month or so to drop on a DigitalOcean VPS, and want to make absolutely damn sure that your chat spaces are yours, you could do a heck of a lot worse.
What follows is somewhere between a tutorial and a write-up of my notes; if you’re not interested in the technical details of my setup you can consider the post to have ended here.
Setting up the server
You can, technically, run an IRC server on your home computer, if you know what you’re doing, your ISP allows it, and you’re not scared of opening an evil port by accident and getting your shit instantly pwned. I have no fucking idea what I’m doing and I am very scared of opening an evil port by accident, so I opened a DigitalOcean account and set up a “basic” tier droplet with 25GB disk and weekly backups for $7ish/month. (Actually I opened up two DigitalOcean accounts, because something I did while attempting to add a payment method set off a security flag and blocked the first account. I use ublock origin + noscript on all my browsers, so probably they didn’t like all the times I refreshed the page with various scripts activated/deactivated to try to get it working, but it could also have been that my credit card is expiring later this year. The second time around I turned off ublock and noscript and used a different card with worse rewards but a later expiry date. I hadn’t gotten anything set up yet on the first account (because they sensibly make you add a payment method first) so it wasn’t really a problem, but if it happens again I guess I’ll be bitching them out on Hacker News.)
I happened to already have some domains that I bought on Namecheap several years ago and did nothing with (pro tip: domains on unpopular TLDs are really cheap, like $10 every few years cheap). You can of course just point all your friends at a static IP, but it’s going to be hard enough to get your friends on IRC when you can tell them “go to my server at blahblahblah.net”; do you really want to be telling them “oh yeah it’s at two hundred dot something dot some other shit dot who cares”? Just know that when you register a domain, you need to give the registrar WHOIS contact details. Namecheap has free privacy protection that you should definitely enable, where the public WHOIS database will just say “contact Namecheap” and then Namecheap will contact you, but Namecheap itself will still need your name and address. If you are extremely paranoid you may not like this, but if you are extremely paranoid you should be using Signal instead of IRC.
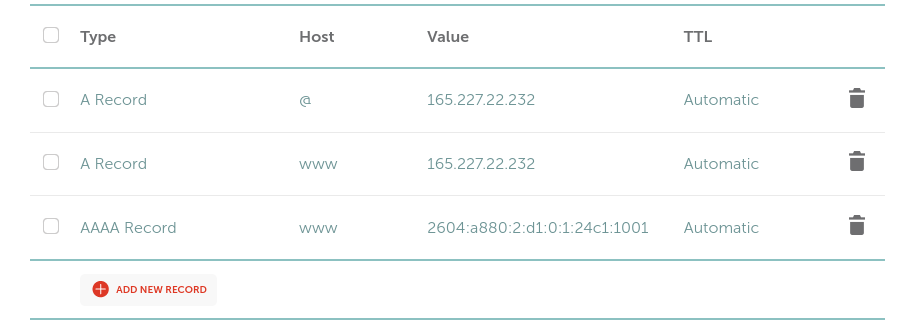
I followed this blog post for the initial setup and bailed when it started telling me to do nginx stuff, which left me with a nice freshly updated Ubuntu 24.04 box with a static IP. I then went to Namecheap, picked one of my camped domains, and added some DNS records pointing at the IP address. On Namecheap you do this by clicking “manage” on a domain, then (after double-checking that your privacy protection is indeed in place — you may want to quickly verify this by looking up the domain on the ICANN website) going to the “Advanced DNS” tab.
At minimum the domain will need an A Record, host “www”, pointing at the IPv4 address of the VPS (which can be found on the DigitalOcean “manage” page for the droplet). If you want to be hip and with the times you should also add an AAAA record, host “www”, pointing at the IPv6 address. (DigitalOcean may want you to shut down the droplet to configure a static IPv6 address — make sure you can SSH into it before you shut it down.) Once the DNS stuff is set up correctly you should be able to SSH into the box using the domain name rather than the IP address. This concludes absolutely everything I know about DNS. Have I mentioned yet that I’m not a networking guy?
After all this domain setup I was finally able to run certbot to generate LetsEncrypt certificates for my domain. (This meant I also needed to open port 80 in the firewall, because certbot uses it to request certificates.) Certs are necessary to connect to clients over TLS, which is desirable because otherwise all your IRC traffic (including the passwords used to claim a nickname) will just be hanging around in cleartext for anyone to sniff. I followed these instructions in the Ergo docs for generating certs (the instructions in the VPS setup blog post assume you have a nginx server running on port 80, which I didn’t, although I wound up setting one up later so that I could redirect the domain name to my README in case anyone happened to open it). Make sure to install the certificate renewal hook from the Ergo docs and then test the certificate renewal with sudo certbot renew --dry-run.
Finally we’re ready to actually install Ergo! This more or less amounts to downloading and unzipping the latest release on the VPS. I was semi-blindly following the Ergo manual, so I downloaded the Ergo release onto my user account on the VPS, then made an ergo user and copied over various configs as specified in “Productionizing with systemd”, then added the systemd service, then discovered that Ergo crashes unless you also copy over the languages/ directory. It would have been more efficient to just unzip everything into the ergo user account in the first place. The installation instructions also say to run ./ergo mkcerts but this is unnecessary if you’ve already gotten certs from LetsEncrypt; just copy them into the ergo directory like the cert renewal hook does.
Oh, and one last firewall change: open up port 6697, which is the Traditional and Customary IRC Port (for SSL/TLS, anyway). The Traditional and Customary port for plaintext is 6667, but the default Ergo config disables the plaintext listener because it’s really not secure (see above re: passwords hanging around in cleartext). So we may as well all leave that one closed.
Configuring Ergo
This is done by copying default.yaml to ircd.yaml and making changes as needed. I highly recommend just reading through the config file and making changes as needed; the comments explain everything pretty thoroughly.
My biggest point of complete IRC n00b confusion was the network name. This is practically the first thing in the config file, and the comment just says “name of the network”, which isn’t very useful. An IRC network, as I eventually learned, is a community of multiple IRC servers that are connected to each other and share the same channels and people. For my purposes it was completely unnecessary (since I’m just trying to run one private little server), so I set it arbitrarily to more or less the same name as the server.
The other thing I set up was the mysql database for message history persistence. Once again the Ergo manual has docs for this. Essentially, you install mysql and start its systemd service, create an ergo_history database and an ergo database user with full privileges on ergo_history, then edit the Ergo config file to enable persistent history and give it the mysql database username and password. (Full confession: I got distracted following the mysql install instructions and skipped a bunch of the database config steps, which caused Ergo to crash with errors about not being able to access the nonexistent ergo_history database. While you’re testing config stuff you may want to start the server with ./ergo run rather than the systemd service so that you don’t have to persuade systemctl to show you the crash logs.)
By default, Ergo operates in “nick equals account” mode. IRC is classically a system built for high-trust environments where you don’t need to “register” an “account”, you just configure your client to tell everyone when you sign on that you’re Jim and then everyone proceeds under the assumption that you’re the same Jim that logged off this morning (and besides, you have the same IP address, this is the 90s, everyone has a static IPv4 address) and sending all your messages in cleartext is just how everyone rolls. This is, uh, not a great match for my personal security posture — recall that the Discord server I’m trying to replace is for coordinating IRL events, so I’m very frequently passing around my full home address. If I’ve given blorbo access to the hidden invite-only channel with my address, I don’t really want glup_shitto stumbling across my IRC server to be able to register their nickname as blorbo and get into the channel thataway. (Uh, I guess maybe this is also less of an issue if you don’t have chat history and so anyone who is not in the channel when the sensitive information was shared doesn’t get to see it? IRC oldheads, let me know. I never used IRC in its heyday because I’m a filthy Zillenial and my friends and I all talked to each other via email/Skype chat/various off-topic forums for our online classes.)
Anyway, in “nick equals account” mode, the Ergo NickServ forces clients to authenticate to nicknames via SASL. The first time someone connects to the server they have to register their password with /ns register <password> or /msg NickServ register <password>, and then every time after that they have to set up their client to “log in” with the nickname and password. This means a nickname operates more like a static username with an attached password, and (since I have this mode configured) I can be fairly confident that blorbo in the hidden invite-only channel with my real actual home address is actually my close friend Blorbo Blingus.
(The downside to this mode is that it’s somewhat tricky to register accounts on certain clients, like the goguma mobile client. More on this later.)
Another thing that’s worth knowing about even if you don’t change it is the list of default channel modes (modes that are set when new channels are created). I’m still pretty bewildered by the lists of channel and user modes, to be honest. Currently my server has one channel called #lobby that any registered account can join and talk in (this is therefore exposed to the public internet) and one channel called #general that is both registered-users-only (+RM) and invite-only (+i). I can then give my friends +v (“voice”) mode on that channel, which is persistent and lets them bypass the invite step. Unfortunately this needs to be done for every friend x every channel; I’d like to be able to match the channel structure of my Discord server and make a number of invite-only channels, then add people to an approved list that lets them access all the invite-only channels, but I can’t figure out how.
One last important piece of configuration: by default, server admin capabilities like registering channels are locked behind the server-admin operator class. In order to access these powers, a client needs to “oper up” by sending something like /OPER admin <password> (which logs into the admin operator account using the configured password). The config yaml stores the password hash; you should generate this with ergo genpasswd and use it to replace the default value. (Yes, this does make it extremely easy to accidentally tell everyone in the server your passwords if you mistype a command. I recommend sending password-containing commands only in chat with yourself, if possible.)
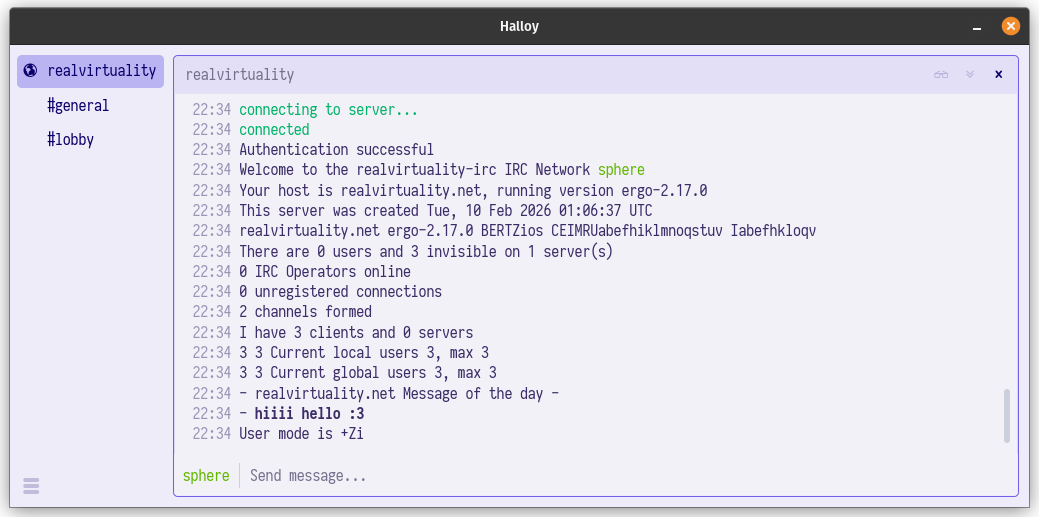
Setting up client(s)
Currently, my recommended desktop client is Halloy, which is a simple, pretty Rust-based client with friendly configuration. More importantly, it’s packaged as a snap, a flatpak, a Homebrew cask, a MacPort, and whatever you call a Winget package. I also liked senpai, which has a couple IRCv3 features like typing indicators and channel pinning that Halloy is missing (also the /np (now-playing) command, which I first triggered by accident, thereby sending everyone the five-hour-long city council meeting recording I’d been watching, and subsequently enjoyed using to spam the chat with the Ninja Info Cards video), but I had zero success convincing my friends to build a Go app from source. Note that for both of these you will need to create a config file that includes your account password (the one used to register your nickname) in cleartext (I wish the IRC ecosystem involved way fewer random config files with cleartext passwords in them, but life cares not for our idle hopes).
Here’s the Halloy config.toml for setting a nickname and password:
[servers.<server name>]
nickname = "<username>"
server = "<server url>"
channels = [<channels to auto-join on startup>]

[servers.<server name>.sasl.plain]
username = "<username>"
password = "<password>"
Like I mentioned earlier, after joining the server for the first time in “nick equals account” mode, users will need to send /ns register <password> or /msg NickServ register <password> to register their accounts. (This only needs to be done once per user, not once per client. After the user is registered, clients can just use the password.)
The only game in town for IRCv3 mobile clients is goguma. Weirdly, it has some of the best support out there for bleeding-edge IRCv3 features like message replies and emoji reactions (gasp!). The project officially only supports the F-Droid release but there is also a community-supported iOS release for $0.99 that seems to work basically the same. Unfortunately it seems impossible to join the server without a password and send the necessary /ns register <password> command in Goguma if the server is configured in “nick equals account” mode, so my current recommendation to my friends is to set up Halloy, use it to register a password, and then use that password when logging in through Goguma.
Conclusions or something
All in all, this took me about five or six hours on a Monday afternoon that I probably should have been spending on my actual job (don’t tell my boss), but hopefully following this write-up will make it slightly faster if you want to do the same. And if you want to hang out on IRC, come vibe at realvirtuality.net!